A while back, I wrote about how I’m using Tailscale to secure my local service, thanks to Tailscale’s built-in certificates. This greatly improved the security of my local environment. Combined with the rather sophisticated ACL policies, you can lock things down pretty well.
That gets you pretty far, but I wanted to secure some services that didn’t offer any real authentication (like Gollum), which I use for notes.
This got me thinking about Mutual TLS (mTLS), which we use pretty heavily at Screenly. Would it be possible to use the certificates from Tailscale for mTLS? As it turns out, yes!
The first thing we need to do is to generate our client certificate.
Generating on macOS
If you installed Tailscale using the App Store on macOS, it does come with the CLI. You just need to do a bit more digging and work around some of the limitations of this and macOS.
I whipped up a quick helper script that generates the certificate, along with a simple snippet that generates a PKCS#12 bundle, which is what Firefox, for instance, requires for client certificates.
#!/bin/bash -ex

TS="/Applications/Tailscale.app/Contents/MacOS/Tailscale"

# Return the FQDN from Tailscale with some magic
FQDN=$($TS status --json | jq -r '.Self.DNSName' | sed s/.$//g)

CERT_PATH="$HOME/Library/Containers/io.tailscale.ipn.macos/Data"

echo "Issuing certificates..."
"$TS" cert "$FQDN"

echo "Generating PKCS#12 bundle..."
echo "You will need to enter a password here, which you will later use when importing the certificate"
openssl pkcs12 -export \
    -out "$CERT_PATH/$FQDN.p12" \
    -inkey "$CERT_PATH/$FQDN.key" \
    -in "$CERT_PATH/$FQDN.crt" \
    -name "Tailscale cert"

# Verify certificate
echo "Let's verify the .p12 file for good measure."
openssl pkcs12 -info \
    -in "$CERT_PATH/$FQDN.p12"

echo "Opening folder..."
echo "Now you can import this certificate into Firefox."
open "$CERT_PATH"
If you’re on Linux, you should be able to just use the tailscale cert command to output your certificate to a directory of your choice and then run the openssl pkcs12 command to generate the PKCS#12 bundle.
Note that you will need to enter a password for the PKCS#12 certificate. If not, many clients (like Firefox) will fail to import the certificate.
Importing into Browser
Installing the PKCS#12 certificate is usually straightforward. On Firefox, you just do:
- Go to Preferences > Privacy & Security > Certificates > View Certificates.
- Click on Import and select the certificate.p12 file.
- Enter the password you set during the creation of the PKCS#12 file.
Setting up a Server for mTLS
There are a lot of ways to set up a server to use mTLS, including Nginx, Envoy, or your favorite web server. The most lightweight way to set up mTLS in my experience is to use ghostunnel.
We are going to assume you’ve set up your server as per my previous guide and have your certs in /etc/ssl/private ready to go.
With that ready, you can just fire up ghostunnel in Docker as follows:
$ docker run -d \
    --name ghostunnel \
    -p 0.0.0.0:443:443 \
    --network my-network \
    -v /etc/ssl/private:/certs \
    ghostunnel/ghostunnel server \
        --listen 0.0.0.0:443 \
        --target my-server:80 \
        --cert /certs/$(hostname -f).crt \
        --key /certs/$(hostname -f).key \
        --unsafe-target \
        --allow-cn my-device.ts-network.ts.net \
        --allow-cn my-other-device.ts-network.ts.net
The above script spins up a ghostunnel instance that reverse proxies the traffic on the Docker network my-network to the container my-server on port 80. We also automatically apply a ruleset with --allow-cn that only allows devices presenting a client certificate that matches either my-device.ts-network.ts.net or my-other-device.ts-network.ts.net. All other requests will be rejected.
Testing with curl
Now back to our client, let’s make a test request using curl:
$ curl \
  --key "$HOME/Library/Containers/io.tailscale.ipn.macos/Data/$(hostname -f).key" \
  --cert "$HOME/Library/Containers/io.tailscale.ipn.macos/Data/$(hostname -f).crt" \
  https://my-server.ts-network.ts.net
Assuming this worked, you should now be able to move on to your browser and authenticate using your newly installed client certificate.
Simply enter https://my-server.ts-network.ts.net and you should get a prompt like this:
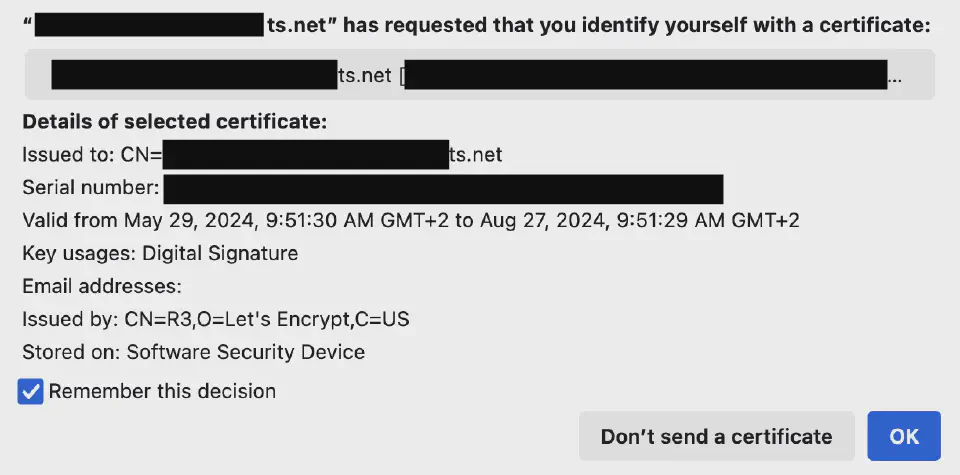
Congrats! You’ve now successfully authenticated using your Tailscale client certificate in your browser.
Do however note that the client certificate will expire, so you will periodically need to repeat the process.
Happy hacking!
Enjoyed this post? Check out my podcast!
If you found this interesting, you might enjoy "Nerding Out with Viktor" - my podcast where I dive deep into tech, entrepreneurship, and security with industry experts.
Listen on:


